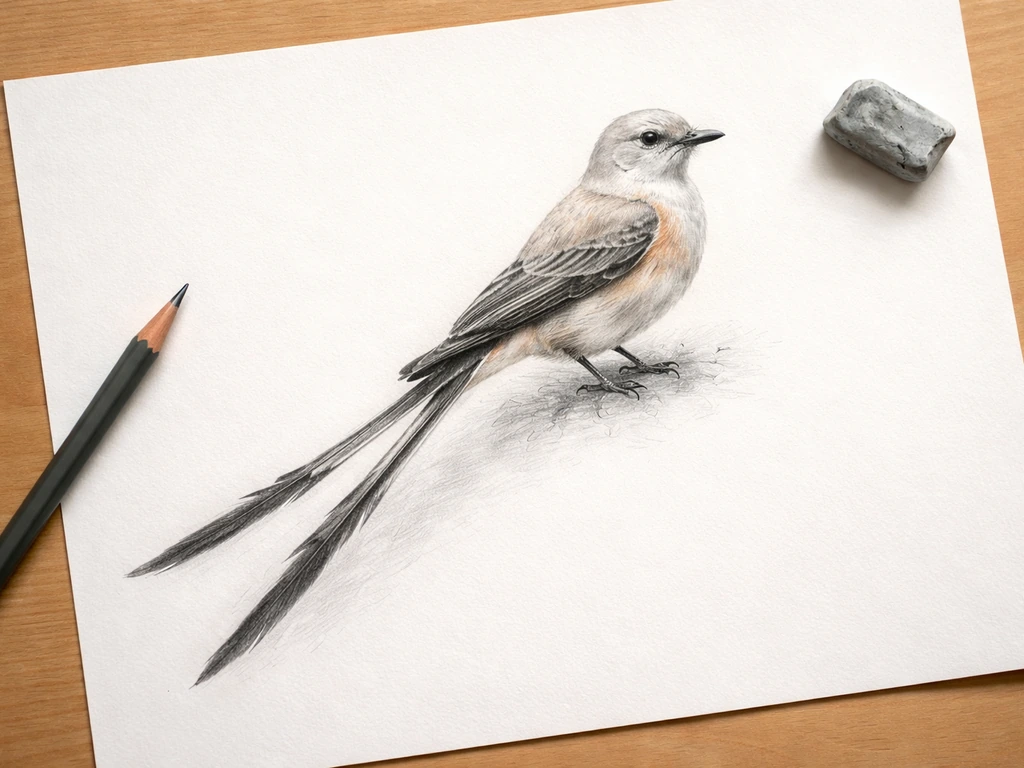
Oklahoma's official state bird is the scissor-tailed flycatcher (Tyrannus forficatus, designated in Oklahoma Statutes §25-98). To draw a convincing one, you need to nail three things above everything else: an extremely long, deeply forked black-and-white tail (up to nine inches on a bird that's only 11–15 inches total), pale gray upperparts, and a salmon-pink wash on the sides and underwings. Get those right and the likeness is immediate. Miss them and it could be almost any flycatcher.
How to Draw Oklahoma State Bird Step by Step

Marcus Webb
13 Jun 2026
Oklahoma's state bird: what you're actually drawing
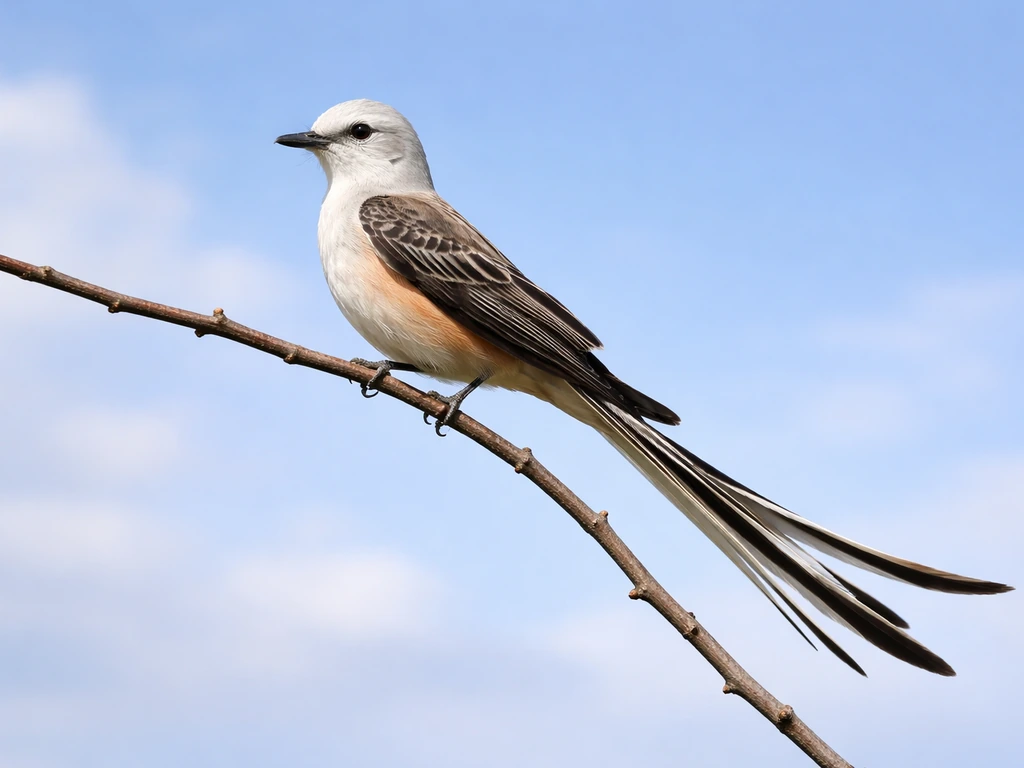
The scissor-tailed flycatcher was officially adopted by the Oklahoma Legislature as the state bird, and it's an easy choice to understand. There is no other bird in Oklahoma, or honestly in North America, that looks quite like it. The tail alone tells the story: two long outer tail feathers split into a deep V that can be as long as the rest of the bird's body. In flight, those streamers flare open like scissors, which is exactly how the bird got its name.
The overall color scheme is understated at first glance. Adults have pale gray on the head, back, and upper breast. The wings are sooty black with a scarlet shoulder patch that shows when the wing is open. The sides, flanks, and wing linings flush salmon-pink, and the axillaries (the 'armpit' area) are a bright red that flashes in flight. The tail is black and white, with the outer feathers showing white edges. Perched, it can look like a slim, long-tailed mockingbird. In the air, nothing else compares.
Find your references before you draw anything
Don't skip this step. The scissor-tailed flycatcher has enough unusual proportions that drawing from memory, or from a vague mental image, will almost certainly produce something that looks off. Pull up at least two reference images: one perched on a wire or fence post (the bird's most common posture) and one in flight showing the tail fully spread.
The Cornell Lab's All About Birds ID page is built specifically to match shapes and key marks, so it's a great first stop. The Macaulay Library on eBird has dozens of photos and videos from multiple angles. The Oklahoma Department of Wildlife Conservation's field guide page is worth checking too because it's regionally calibrated. To draw the Nevada state bird, look up photos that match Nevada’s species and practice the same tail and wing proportions from clear angles.
Once you have references, decide on your style. A quick naturalist sketch works great for capturing the silhouette and proportions, and it's forgiving enough for beginners. A more detailed colored-pencil or ink rendering lets you work in the salmon-pink plumage and the sooty black wing contrast, which are what make this bird really pop off the page. Either way, the construction steps below apply to both.
Build the basic shapes: proportions and silhouette first
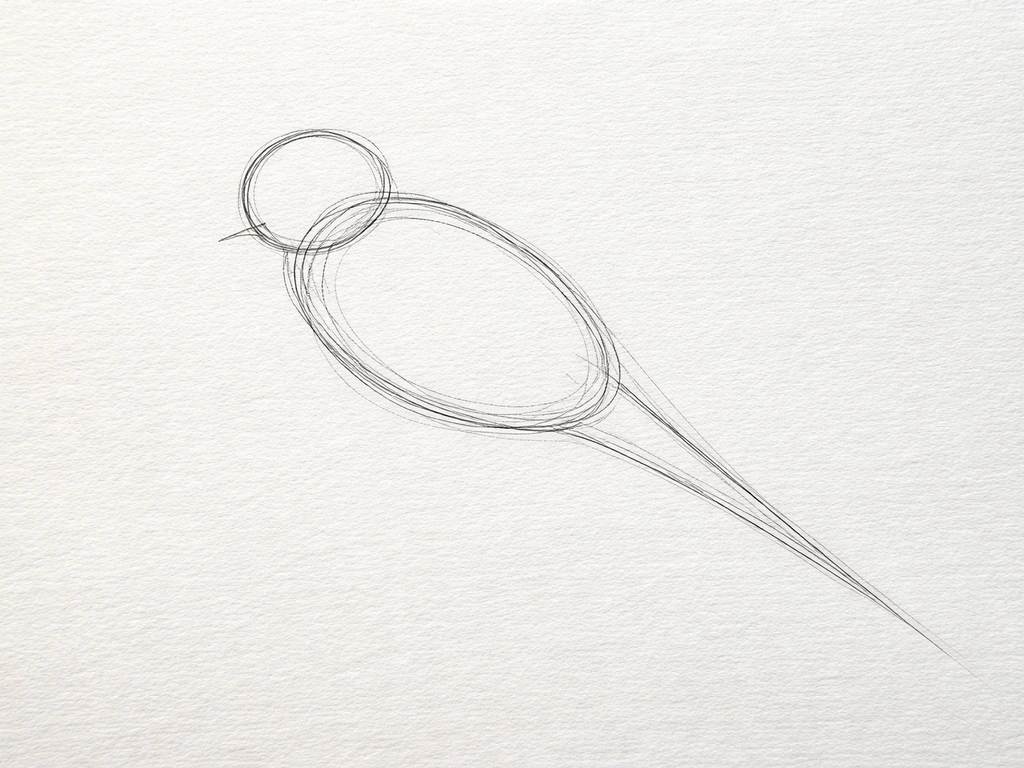
Start with two overlapping ovals: a smaller one for the head and a larger elongated one for the body. The body oval should be roughly 1.5 to 2 times the width of the head and about twice the height. The head oval overlaps the front-top of the body oval. Keep your lines light at this stage. You're just blocking in mass.
Now draw the tail, and make it long. For a perched bird, the tail extends straight back or slightly downward from the body. The total tail length should be at least equal to the body length, and ideally a bit longer. Draw two parallel lines extending from the base of the body, then let them flare slightly apart at the tips to suggest the fork. At this stage you don't need the split itself, just the general length and direction.
For a flying bird, the tail spreads into that dramatic V. The outer streamers bow outward and the fork becomes very obvious. This is the more impressive pose but also slightly harder to balance compositionally. If this is your first attempt, the perched pose is more forgiving and still shows the key features clearly.
Draw a horizontal construction line through the middle of the head circle and a vertical line down the center of the body. These will anchor everything else you place. The wing attachment starts roughly where the head-body junction is, just below the shoulder area. The legs attach near the lower-center of the body oval, not at the very bottom. A common error is placing legs too far back, which makes the bird look awkward and off-balance.
Place the defining features: bill, eye, wings, tail fork, and feet
Bill and eye
The bill is short and stout, typical of flycatchers. It's not a thin warbler bill and not a heavy hawk bill. Place it at the front of the head oval, pointing slightly downward from the horizontal construction line. The eye sits on the horizontal construction line, about one eye-width back from the base of the bill. It should look alert and round. Draw a small dot in the center and a thin highlight spot to make it read as a real eye rather than a flat circle.
Wings
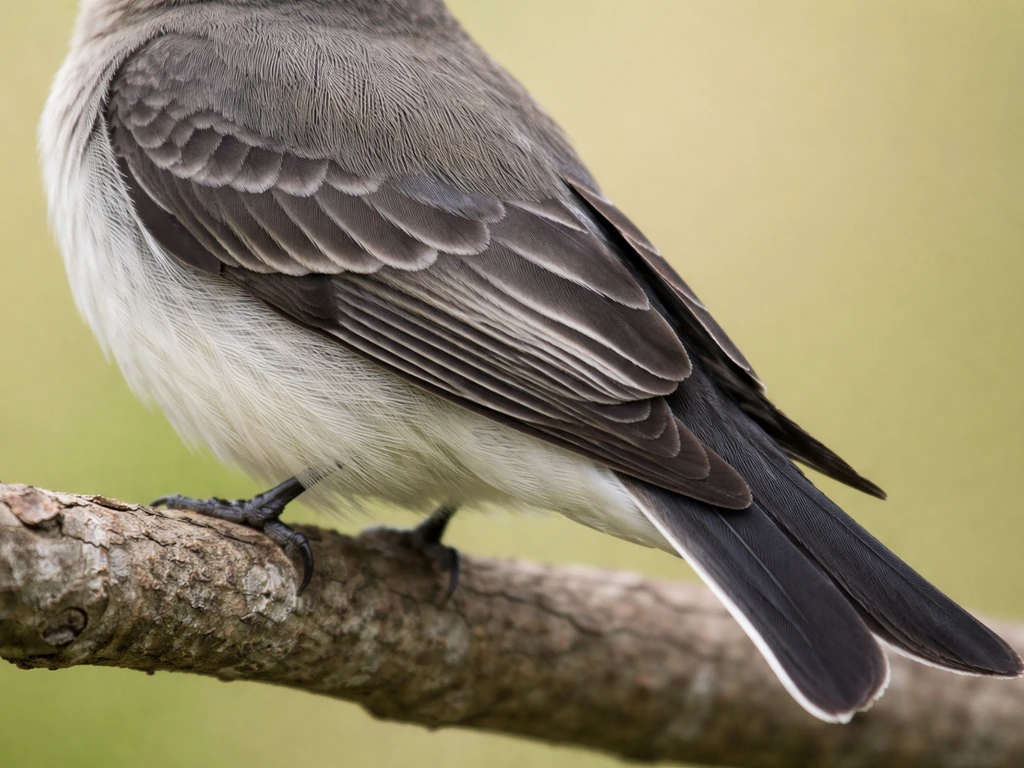
On a perched bird, the folded wings sit along the back and sides of the body, extending to roughly where the tail begins. The wingtip, when folded, falls well short of the tail tip (the tail is so long that the wingtip looks stubby by comparison). Draw the wing as a flattened shape hugging the body, wider at the shoulder and tapering toward the tail. The sooty black coloring of the wings creates a strong contrast against the pale gray back, so mentally note that boundary line because it will be important during shading.
Tail fork
Now define the fork. Go back to the tail lines you drew and split the tips into two distinct outer feathers that diverge clearly. The inner tail feathers are shorter and create a layered, stacked look before the two outer streamers take over. On a perched bird the fork may be closed or slightly open. On a bird in flight, draw the streamers spread wide in a deep V, with visible white on the outer edges of the feathers and black toward the centers.
Legs and feet
The scissor-tailed flycatcher perches on exposed spots: fence wires, utility lines, dead branches. If you are also looking for another state bird drawing idea, look up how to draw the Ohio state bird for a similar step-by-step approach. The legs are short and the feet grip a narrow surface. Draw two short lines descending from the lower-center of the body oval, then add three forward-facing toes and one backward-facing toe wrapping around whatever surface the bird is sitting on. Keep the legs proportionally short. This isn't a long-legged bird.
Color, plumage, and shading
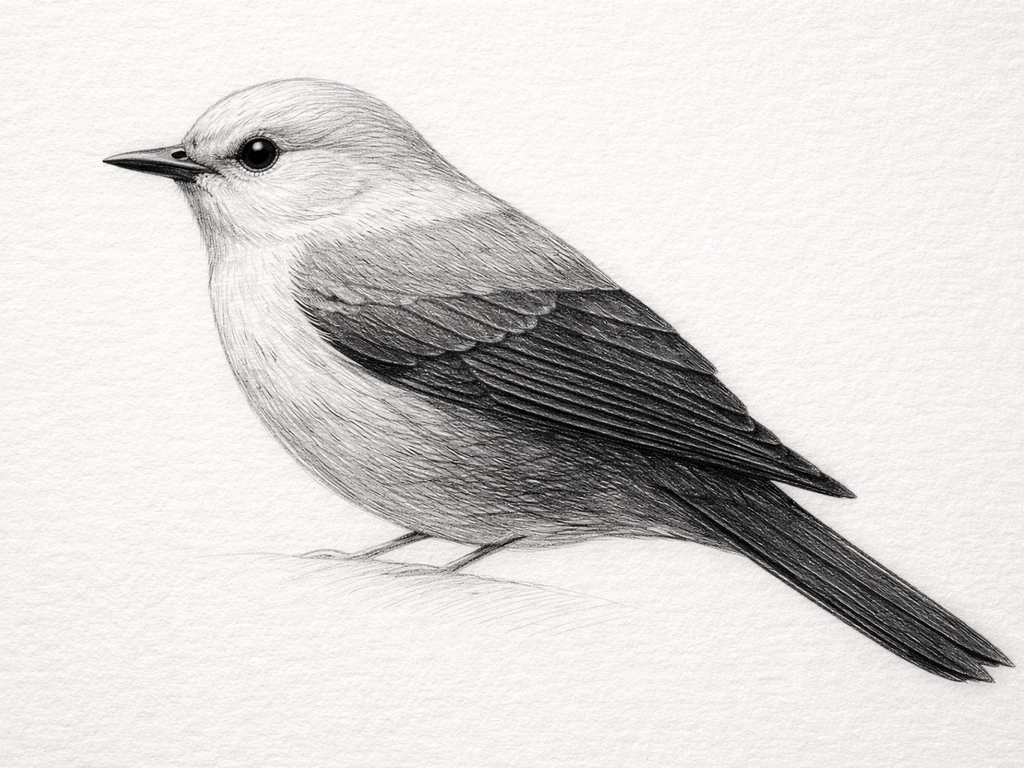
The color scheme has a few key zones that you need to keep distinct. Blurring the boundaries between them is the fastest way to lose the likeness.
| Zone | Color | Drawing/shading note |
|---|---|---|
| Head and upper back | Pale gray, almost white | Light pencil pressure; leave near-white highlights on the crown |
| Wings (folded) | Sooty black | Heavy shading; sharp edge against the pale back |
| Shoulder patch | Scarlet/red | Small area at the bend of the wing; critical accent color |
| Breast (upper) | Pale gray-white | Very light, transition zone to the pink sides |
| Sides and flanks | Salmon-pink | Gradual warm wash; deepen toward the wing edge |
| Underwing linings | Salmon-pink to bright red axillaries | Visible only in flight; keep edges crisp |
| Tail (outer feathers) | Black with white edges | Strong contrast; white outer margin is a key ID mark |
| Bill and legs | Dark gray/black | Minimal detail needed; keep it simple |
For pencil shading, follow the direction of the feathers. Shade the wings with strokes going from the shoulder toward the wingtip. On the tail, shade each feather individually from base to tip. Use heavier pressure on the sooty black wings and very light, almost ghostly pressure on the pale gray head and back. The transition from gray back to black wing is one of the sharpest edges on the bird, so don't blend it.
For colored pencil work, a practical workflow is to start with the flight feathers (the long wing and tail feathers), then work up to the upper wing, and finish with the body. This keeps the darkest, most defined areas as your anchor and lets you build the lighter tones around them. The salmon-pink on the sides is best built up in thin layers rather than one heavy pass. Start with a light peach, add a second layer of salmon, and optionally deepen the edges near the wing with a touch of coral or warm red.
Make the eye pop last. Add a crisp dark outline around the eye and a small white highlight dot. This is a small detail that makes the whole drawing read as alive.
Finishing up: cleanup and a likeness checklist
Once you've added shading and color, erase any visible construction lines. Then hold the drawing at arm's length and compare it to your reference. The checklist below covers the mistakes that show up most often when drawing this bird.
- Tail too short: The tail should be at least as long as the body, ideally longer. If it looks proportionate, it's probably too short. Extend it.
- Fork not deep enough: The split at the tail tip should be obvious and wide. A shallow notch doesn't read as a scissor-tailed flycatcher.
- Bill too long or thin: The bill is short and stout, not needle-like. If it looks like a warbler or a mockingbird bill, shorten and thicken it.
- Wings placed too high: Wing attachment should be at the shoulder/neck junction, not halfway up the head. High-placed wings make the bird look hunched.
- Legs too far back: Legs should attach near the center-bottom of the body. Too far back and the bird will look like it's leaning backward.
- Pale back and black wings blending together: These two zones need a sharp, clean boundary. If they've merged, re-establish the edge with a darker stroke along the wing margin.
- Missing the salmon-pink: If your drawing looks monochromatic gray and black, you've lost the species. Even a light pink wash on the sides makes a huge difference.
- Tail feathers not showing white edges: The outer tail feathers have visible white margins. Without them, the tail reads as uniformly dark and loses its character.
How it compares to similar birds and other state birds
The scissor-tailed flycatcher's most likely lookalike is the Western Kingbird. Immature scissor-tailed flycatchers especially can cause confusion, but the key differences in a drawing context are: blank" rel="noopener noreferrer">Western Kingbirds have a yellow belly (not salmon-pink sides), a shorter and less dramatically forked tail, and lack the white outer tail margins. If your drawing could be mistaken for a Western Kingbird, check those three things.
The Fork-tailed Flycatcher is a closer structural relative with a similarly extreme tail, but it has a black cap and a very different body pattern. In a drawing, the Fork-tailed Flycatcher's cap is a strong distinguishing mark the scissor-tailed flycatcher lacks. The scissor-tailed flycatcher has a pale gray head with no contrasting dark cap.
In terms of other state birds, the scissor-tailed flycatcher is one of the most visually distinctive choices any state has made. States that picked common, widely distributed species like the Northern Cardinal (shared by seven states) or the Western Meadowlark (shared by six) went for familiarity. Oklahoma went for spectacle. If you want to learn a different state bird, try our guide on how to draw Illinois' state bird how to draw Illinois state bird.
If you've been drawing other state birds like the Nevada state bird or the Arizona state bird, you'll notice this one demands more attention to tail proportion than almost any other. If you want another state-bird style to try right after this, use the guide on how to draw hawaii state bird as a related comparison.
If you want to learn how to draw the Arizona state bird next, use clear reference photos focused on the posture and head shape. If you also want to learn how to draw the Ohio State bird, focus on the bird's most recognizable shape and color details first, just like you would for any state bird Nevada state bird. If you're looking for the Nevada state bird next, focus on its signature shape and colors before you start shading.
If you're also wondering why the nene is Hawaii's state bird, it comes down to its cultural importance and conservation story Nene hawaii's state bird. The nene Hawaii’s state bird is a great example of how a species’ survival and cultural meaning can earn official recognition. That tail is the whole drawing. Nail it, and you've nailed Oklahoma's state bird. If you want the Illinois version instead, focus on the bird Illinois selected as its official state bird and match its shape and markings Oklahoma's state bird.
If you're curious about Hawaii instead, the state bird is the Hawaiian coot what is the state bird for hawaii. The Hawaiian coot is the state bird for Hawaii.
FAQ
How do I draw the scissor-tailed flycatcher’s tail when the bird is perched but the fork still needs to look right?
Draw the tail as two long outer streamers from the same base point, then show a subtle fork by opening the tips slightly (perched birds can look nearly closed). Make the inner tail area a stacked, shorter segment so the outer feathers can clearly dominate in length.
My bird looks too much like a Western Kingbird. What should I change first in the drawing?
First check tail length and the outer white margins on the tail feathers. A Western Kingbird will usually have a shorter tail and less dramatic outer feather edges, so make your V split longer and ensure the outer feathers read as black with white along the outer sides.
What’s the fastest way to get the proportions correct if I’m using only one reference photo?
Use a single perched photo to lock head-to-body shape and tail extension direction, then estimate the tail length using the rule of thumb from the bird’s silhouette (tail at least as long as the body, ideally longer). Even if your reference is not in flight, keep the tail as the primary mass and build everything else around it.
Should I draw legs and feet as detailed claws, or simplified shapes?
Keep legs short and simplify the feet to toe bundles that wrap around the wire or branch. The toes should face in a realistic spread (three forward, one back), but avoid overly long, thin legs, since that instantly changes the bird’s overall flycatcher silhouette.
How can I shade the salmon-pink sides without muddying the contrast with the pale gray body?
Build the pink in thin layers and keep it confined to the sides, flanks, and wing lining areas. Leave the pale gray head and upper back very lightly shaded, then sharpen the boundary line where the gray meets the sooty black wing (that edge is a major likeness cue).
When using colored pencil, what order prevents smudging the lighter areas?
Start with the darkest elements (wing and tail feather centers), then layer in the flight feathers, then work up toward the upper wing and back. Finish with the salmon-pink areas using light first layers, because it is easier to add warmth than to lift it off once it has tinted the gray.
How do I place the eye so it reads as “alert” instead of a flat dot?
Put the eye on your horizontal head line, then add a crisp dark outline plus a small white highlight. The highlight should be tiny and near one side of the pupil area, not centered, so it looks like the bird is catching light.
What’s the most common tail construction mistake for this bird?
Most drawings start the tail too high or too short, so the bird loses that scissor-like silhouette. Anchor the tail at the body base, keep it long enough to reach beyond where the wingtip would end when folded, then make the fork become more dramatic at the tips.
If I want to draw it in flight, how can I balance the head and tail without the pose looking tilted?
Use your center construction lines to keep the head orientation stable, then treat the tail fork as the main directional force. Let the outer streamers bow outward into a deep V, but keep the body axis consistent, so the tilt comes from the tail spread rather than the whole bird leaning awkwardly.
How do I avoid accidentally turning the bird into a generic flycatcher?
Commit early to the three signature zones: pale gray upperparts, sooty black wings with a strong shoulder contrast, and the long black-and-white tail with visible outer feather edges. If those three are distinct by the time you start shading, the rest of the details become much easier to match.
Next Article
How to Draw Nevada State Bird Step by Step
Step by step guide to drawing Nevada’s state bird accurately, with feature tips, transfers, and realistic shading